Showing posts with label Recipe. Show all posts

Saturday, February 10, 2018

Pancakes and Shoppix

Happy Saturday evening All!  I must be almost back to my normal self after fighting a very bad cold or two over the past couple of weeks.  Geesh has my energy been swiped!  Pancake Day is Tuesday, so in preparation for that yummy day, I'm going to share the recipe I use every single time I make pancakes at home... oh yeah, they're the fluffy American version... and they're soooo good. I also want to introduce you to Shoppix - an app that earns you rewards when you snap pictures of your receipts. 

Many Saturdays begin with pancakes. Delicious... hot... yummy... pancakes.  So American, right?!  Every now and then we'll even enjoy them during the week for supper with some bacon and either a fruit salad or smoothie.  I'm not one for European-style flat pancakes or crepes... do nothing for me, tbh.  The shop shelves are prepped with all of the ingredients and skillets to make pancakes on Tuesday.  That's fine, but for inexpensive, fluffy pancakes, here's the recipe I follow:

Pancakes 
Recipe from a Betty Crocker cookbook. Recipe for 6 pancakes; can be easily doubled.

1 large egg
1 cup all-purpose/plain or whole wheat flour
3/4 cup milk
1 tablespoon granulated sugar
2 tablespoons vegetable oil
3 teaspoons baking powder
1/4 teaspoon salt
Butter

1. Beat egg in medium bowl with whisk until fluffy.  Beat in remaining ingredients except butter until smooth (but don't over mix).

2. Heat a griddle or skillet over medium heat. Grease with butter to prevent sticking.

3. For each pancake, use a 1/4 cup measuring cup to scoop out equal-sized pancakes. Cook pancakes until bubbles rise to the top of the pancake then flip pancake to allow to cook for a minute on the other side. 

4. Serve with warmed maple syrup.
We use Costco's Kirkland 100% Pure Maple Syrup.  This 1L jug of syrup works out cheaper per 250ml than the maple syrup from Aldi.  

We sometimes enjoy pumpkin spice pancakes, banana pancakes, chocolate chip pancakes and oatmeal pancakes.  There are so many variations!  On Pancake Day, we'll probably have savoury pancakes, but I haven't decided what exactly.

I downloaded the Shoppix app last month with the aim of finding little ways of making money with little effort.  So far, it has been quite easy - I simply submit a picture of my receipts and collect tokens, which can be redeemed for gift cards from Amazon.co.uk, iTunes and Love2Shop.  I can also earn tokens by earning bonuses, taking short surveys and referring friends to Shoppix.  It's really not complicated or time consuming. I haven't redeemed any tokens yet, but they're adding up quickly.  

If you'd like to try Shoppix for yourself, feel free to use my referral code BWYWDADY when you download the app and sign up. We could both earn 200 tokens!  


Just a quick overview of our day - today was a "Home Day" for the Boltons, mainly because my in-laws are coming to visit at the end of the week and some major organising needed to happen today - some did, but we didn't get as far as I would have liked.  After pancakes this morning, I headed to Home Bargains for a few items:
Allinson's Plain Flour - 69p
Wild Bird Seed - 99p
Heinz mayo - 89p (a super buy for a 710ml jar)
Bag of Cadbury Picnic Bites - 49p
4x boxes of Tempo tissues - 99p each
Tyrrells crisps - 79p
Toilet bowl cleaner - 59p
Hills biscuits - 26p
Heart chocolates for the girls for Valentine's Day - 79p,
Microfibre dish cloths - 99p
Red lentils - 79p
Fig rolls - 39p
Aquafresh toothbrush for Ellen - 95p, which I saw a little while later at Tesco for £2! 
LOVE Home Bargains!

Then I went to Tesco - I won't go through everything I bought there, but one thing I really love are the FREE Tesco magazines that can be found at the checkouts.  I pick one up on the way in to look at the page of coupons in case there's something I can use in store.  Once home I made homemade ranch dressing mix to make a dip for veggies to have with lunch, then lunch, then dishes... boring.  I did, however, listen to the inspiring Retire Inspired Podcast while I was making lunch.  We spent the afternoon organising the girls' rooms; in attempt to de-clutter, I managed to give away a chalkboard easel that we had been given, but nothing else I posted on the Facebook selling pages sold yet... bummer. 

Something that frustrates me soooo much is the cost of soup at the grocery store... it's sooo expensive for what you get. Think about it! It's mostly water and vegetables!  So although I did buy a small container of carrot and coriander 😝 soup for £1 at Tesco for the girls for tomorrow's lunch, I made a huge pot of my favourite curried butternut squash and lentil soup this evening to last us a few days plus some for the freezer.  Here's the link to the recipe.

My super-exciting, envy-inducing day has concluded with submitting receipts on the Shoppix app, updating our budget and writing this blog while enjoying this super-amazing bar of HRH Highgrove Milk Chocolate... with the hubby, of course. This bar of chocolate was part of a Fortnum and Mason gift basket we received for Christmas (my friend, Pam, really truly knows the way to my heart), but out of curiosity, I perused the Highgrove website for said bar of chocolate.... £3.95!!! What?!  Sooo delicious.  And there's a salted almond chocolate bar, too.  Oh, yes! 

Pancakes, Home Bargains, Tesco, organising, soup, Shoppix and a bar of chocolate.. that's what dreams are made of, right?  Not exactly, but that was my day.  How was yours? 

Sunday, December 17, 2017

"Beans and Rice, Rice and Beans"

While looking for another recipe the other evening, I was reminded of a recipe for black bean soup that I haven't made in a while... probably a couple of years... and boy, did it sound good!  Not only simple to make, delicious and nutritious, but it's inexpensive, too!  I was a little nervous about what my daughters would think of it, but recently, I never know what they will like and not like, so I didn't feel I had much to lose. 

I better quickly explain the title of this post.  Dave Ramsey, the American financial "advisor" radio host who I'm an avid listener of and whose advice I mostly follow, says all the time when he advises people how to get out of debt, "Beans and Rice, Rice and Beans", meaning to cut waaayy back on expenses in your life.  We quite literally followed his advice!

I keep my eyes peeled for black beans when I'm out and about, but the only place I can find them are at Sainsbury's for 65p a carton (below).  Not terribly expensive, but I bought the tin of black eye beans for 30p, so less than half the price.  I hoping to find dried black beans, but even spending £1.30 for two cartons of beans isn't too bad. 


This is the original recipe from Comfy in the Kitchen; however, quantities aren't listed, so I'll give you an idea of what I used - it's a pretty straightforward soup recipe.

2 Tbs. vegetable oil
1 medium onion, chopped
2 cloves of garlic, chopped
1/2 tsp. chili powder (or more, if you like it a little spicier)
1 tsp. cumin (or slightly more, if you prefer)
2-3 cartons of Black Beans (or two, plus one can of black eye beans, like I did)
2 stock cubes with 2-3 C. of water or chicken stock (depending on the consistency you'd like to achieve)

Heat the oil in a medium/large saucepan/pot, then add the onion.  After the onion cooks a few minutes, add the garlic and stir being careful not to allow the garlic to burn.  Add the chili powder and cumin, stir and cook for about an minute.  Add the beans, crumble the stock cubes in and add the water.  I used about of cup of homemade chicken stock along with the stock cubes and water.  I let this boil about 10 minutes, then turned off the heat used a immersion blender (handheld stick blender) to puree the soup a bit. I wanted my bean soup to be a bit chunky, so I only blitzed it a little bit. I ended up boiling it another 5 minutes to allow more water to evaporate so it was a bit thicker.  That's it.

I boiled plain 'ol rice while I was making the soup and served this with the bean soup, topped by a dollop of plain Greek yogurt and a sprinkle of cheddar cheese.

To my amazement and delight my girls gave this dish two thumbs up!  Not only did this £2 meal - for the whole pot - feed us all this evening, there are at least 3 meals leftover in the fridge.  I hope you'll try this soon.  Please let me know if you find black beans cheaper anywhere else and if you try the soup in your home! 

Saturday, November 11, 2017

How We "Spent" Our Day: Child's Play

Today was basically a kids' day - swimming, McDs and a soft play birthday party.  Yay! Right?! Earlier this week, we gave the girls the option of going swimming - which they've been asking to do for about a couple of months now - and going to the cinema.  The cinema would have been cheaper, but it was their choice this time.  I'll let you in on a bit of a Bolton budget secret - we budget £20 per month for "play".  A friend asked me recently whether this is enough.  It is for our family, for the most part, anyway. We are finding, however, that our girls are reaching the age that they are no longer free and we actually have to pay for them... bummer!  

We've been going swimming at the same pool for years now, but recently they increased the price for an adult to swim 50% - from £5 to £7.50 each.  Now that Ellen is 5 we have to pay £5 for her, too.  So what used to cost us £10 for the family to go swimming, now costs £20.  Grrr... Jeff even rang around to other pools, but there were either swimming lessons going on, the pool didn't permit non-members access or it would have been actually more expensive.  So, off to our usual pool we went.  It is a lovely place... clean.... and very few other people...plus there's a Jacuzzi that I always take advantage of.  I like to think of it as a cheap spa break... as long as I drown out the sound of the girls' voices talking to me... the... entire... time.  Never mind.  We did end up swimming for an hour and a half.
We also treated the girls to McDonald's on the way home. Of course, it wasn't spontaneous and it fit into our "Restaurants" budget.  We ordered two Happy Meals, 2 Big Macs, 2 medium fries and a "festive" coffee.  It cost us less than £10 for all of us to eat at McDs.  I must say... I was pretty impressed with myself.
The Happy Meals were the usual price £2.79 each.  Jeff and I each had a Big Mac and medium fries for £1.99 having used two receipts with codes; a thoughtful colleague of Jeff's actually gave him two receipts with the codes from the online feedback surveys that we could use today.  
And what about the large "festive" coffee?  It was free.  Imagine my excitement when I finally had six stickers to fill the coffee card above.  And no, of course, I didn't buy the six coffees to get the stickers... okay, I did buy one coffee in July... I found them... on cups... on the ground.  Eeeewww?!?! "Lauren, that's really weird."  Yep, I'm weird... so what.  I also pick up loose change... and the £5 note on the ground on a recent short stay in London... so what's the difference?  Not much.  I've actually tried to fill a card the past two years and haven't been successful, but this year I finally achieved my goal. YES!  I was even more excited that I could use this free coffee card on a fancy, whipped cream-topped coffee.  I did share it with Jeff, in case you were wondering.  I also asked for a cup of water, rather than paying for a Coke. So, there you go... McDs for a family of 4 for £10. Not bad.  

I spent a few couple of hours baking this afternoon - peanut and chocolate granola and cinnamon streusel pumpkin cake.  I added a couple of spoonfuls of this granola to natural Greek yogurt and Brenna loved it.  Mommy win!

Later this afternoon, we had a fun time at a friend's birthday party which took place at a indoor play area.  We spent £1 on a ride-on game that Brenna then abandoned halfway through.  
All-in-all we had a fun family day.  Totally worth the £20 to go swimming and the £10 for lunch at McDonalds.  Now that we've spent the allocated £20 in the play category of our budget, we may not be able to spend money on "play" until December, but that's ok. I'm sure we'll find other way to have fun for free!

Friday, June 30, 2017

My Homemade Vanilla Extract is Ready!

Ta da! My homemade vanilla extract is finished and ready to use!  Almost six months ago, I began my "experiment" after being quite disgusted at the cost of vanilla extract from my supermarket - £6 per bottle!  The bottle of maturing/brewing/steeping (whatever you choose to call it) vanilla extract has been sitting in the corner of my kitchen getting darker over time.  I gave the bottle a little shake every so often, and now, six months later, it's ready to use in my recipes for breads, cakes and muffins.  And it smells sooo nice, so vanillaey.

Tonight I poured some of the extract through a sieve into a jug, then poured it into a cleaned and de-labelled bottle that was previously filled with expensive Nielsen-Massey vanilla.  So what about the rest of the vanilla in the larger bottle?  I topped it up with more vodka to mature until my little bottle needs refilling.  How long can I keep topping it up for before the vanilla pods lose their "vanilliness"?  I don't know!  I suppose when the colour stops getting darker.  It's an experiment, right?
Just as I thought this would be a short blog post, I asked myself a question that I ended up having to Google: "Is there a difference between 'essence' and 'extract'?"  Good question, Lauren!  The answer in short, is yes, there is a difference.  According to bakingmad.com, "Whilst often cheaper, essences or flavourings are a chemically developed flavouring and can often give a synthetic taste to your baking. Extracts are flavours 'extracted' straight from the source, for example vanilla extract would be taken from the vanilla bean, capturing the delicious and distinctive, rich flavour." So while essences may be cheaper, they are made from synthetic chemicals!   

I'd love to know if you feel inspired to make your own vanilla extract, or if you've already made your own, too!

Friday, March 3, 2017

It's a Brownie Kind of Day

It's Friday. A cold, wet, dull kind of day.  The perfect kind of day for brownies!  Don't you just love the fudgy, gooeyness of a chocolate brownie?  I love the crunchy edge and the thin, crispy top. Simply yum!

My brownie recipe is inexpensive, simple and uses pretty basic ingredients. Plus, they can be whipped up in about 10-15 minutes - prep time, that is.  I love to use my KitchenAid mixer whenever I can - I feel like Ina Garten or Ree Drummond when I'm using it.  Just look at the ribbons of gooey brownie batter cascading from the whisk!   By the way,  my homemade vanilla maturing away just to the left of the mixer (check out my blog about this here).

My brownie recipe isn't mine at all - it's simply from my Betty Crocker cookbook (but here's the link to the online version).

Betty Crocker Ultimate Brownies
Serves 16 (or 2 or 1!!!)

Ingredients
2/3 cup (151g) butter or margarine (I use butter)
oz unsweetened baking chocolate, cut into pieces (I use inexpensive dark chocolate from the chocolate aisle)
1 3/4 cups sugar
teaspoons vanilla
eggs
cup Gold Medal™ all-purpose flour (a.k.a. plain flour)
cup chopped walnuts (totally optional)
Directions
  • 1 Heat oven to 350°F (180°C, or 160°C for fan ovens). Grease bottom and sides of 9-inch square pan. (I line the bottom with baking paper so the brownies will pop out of the pan easily once they're baked.) In 1-quart (small) saucepan, melt butter and chocolate over low heat, stirring constantly. Cool slightly (while you do the next step).
  • 2 In medium bowl, beat sugar, vanilla and eggs with electric mixer on high speed 5 minutes (or until the eggs and sugar have lightened in color which is about 3 minutes, but the longer the better). Beat in chocolate mixture on low speed. Beat in flour just until blended. Stir in walnuts, if using. Spread in pan.
  • 3 Bake 40 to 45 minutes or just until brownies begin to pull away from sides of pan. Cool completely in pan on cooling rack, about 2 hours. For brownies, cut into 4 rows by 4 rows.
Unfortunately, though, I won't be having any of these brownies... ok, maybe one... tomorrow.  One batch (in the bag) is going to the builders and volunteers who are helping with a DIY SOS build in Telford this week. DIY SOS is a show on BBC 1 that recruits local tradesmen to renovate homes so that sick or disabled family members can live better lives at home.  I'm excited to have the opportunity to help in a very, very small way.  The other batch is going with us tomorrow when we visit our long-time friends.  These brownies are so easy to make that they can be enjoyed any day of the week... like today!

Tuesday, January 24, 2017

Slow Cook a Whole Chicken


Part of my money-saving mindset is, not only getting the most from every penny spent, but also getting the most from everything that I've bought.  One of the ways I do this is by cooking a whole large chicken in my slow cooker.  And it's seriously quick and simple to do.  The meat falls off the bone when it's finished and is juicy and tender.  Two added bonuses: no meat goes to waste and less energy is used than if you were to roast the chicken in the oven. Ca-ching!

Remember the reduced large chicken I bought a couple weeks ago? It went in the freezer the day I bought it and came out to thaw the day before it went in the slow cooker.

First I place 3 small upturned dipping bowls in a large 6.5L slow cooker. This will prop the chicken off the bottom of the slow cooker to allow the chicken juices to sit below the chicken during the cooking. If you don't have small bowls, simply ball up some aluminum foil and use this instead.  Another option is to put carrots and onions on the bottom to slow cook with the chicken (check out some other websites), I just haven't tried this yet.
Next, place your chicken on top of the bowls or foil breast-side down/back-side up.  This allows the juices from the dark meat in the back to baste the drier white meat in the breasts.

If you wash your chicken before roasting it, please don't.  From what I read and understand on other websites, this can spread bacteria and salmonella around your sink and kitchen, and it's simply not necessary to do so.  So package to slow cooker (or oven).  Then I sprinkle some salt and pepper on top of the bird.
Put the lid on.  You don't need to add any water to the bottom of the slow cooker either. Oh, and make sure to turn it on! (Not that I've ever forgotten... ahem!)
Allow the chicken to cook on low for 7-8 hours or on high for about 5 hours.  I prefer to cook it on low for 8 hours; the one time I tried to cook it on high for 5 hours, the meat wasn't quite as tender and juicy as when I cooked it on low for a longer time.
This is the finshed product.  Perhaps the one downside of cooking a chicken - or any meat - in the slow cooker is that it doesn't brown like it does in the oven. You aren't going to get that perfectly goldened bird.  I simply serve the meat directly onto plates for dinner.  If you do want to brown the skin of the chicken, you can place it on a baking tray and brown it under the broiler for a few minutes. I'm just not that bothered.

Now that you have that wonderful meat, serve it as you would with veg and side dishes.  We like ours with barbecue sauce.  With our family of 4, there is always leftover chicken.  We usually end up using it for chicken wraps for the next evening's meal, but as others suggested on the Finding the Pennies Facebook page  leftover chicken can be used in chicken and vegetable pie, chicken salad and chicken soup. I'm sure there are many, many more uses.

Ok, I'm not finished.  At the bottom of the slow cooker you're left with glorious, golden chicken stock.  Once the slow cooker has cooled (after dinner for us) I strain the juices through a sieve and put it in the fridge. As the liquid cools in the fridge, the fat left in the juices, rises and solidifies on top.  I skim this off and throw it away.  I almost feel guilty throwing away perfectly good chicken fat, but I simply don't know what I can do with it!  I'll have to ask my friend. If she has ideas for me, I'll be sure to pass them along.  I take the jelly-like chicken stock, tip it into a freezer bag, label it and stick it in the freezer for the next time I'm making soup.  I wish I had taken a picture of this step, but I forgot. Sorry :o(

I hope this has inspired you to try to slow cook a chicken. It's definitely worth doing and is something I do at least once a month.  Enjoy!

Friday, January 13, 2017

Homemade Vanilla Extract


I have a confession: I'm a bit of a kitchen snob.  Surprising?? Uh, not really.  I've always enjoyed cooking, baking and watching cooking shows.  And just like my kids pretend to be their favourite cartoon characters, I somewhat pretend I'm a fancy-shmancy cook using fancy-shmancy ingredients, like amazing Nielsen-Massey Vanilla Extract. I've been treating myself to the real shebang for a few years now, but then about a year or so ago, I saw how to make homemade vanilla extract on Pinterest. (Love Pinterest!)

At Sainsbury's, a 118ml bottle of Nielsen-Massey sells for £6.  This seems a little expensive... but totally worth it.  However, in my "how can I do better?" mentality, I thought this would be the time to give making my own homemade vanilla extract a go.  


If you take a look at the ingredients, you find that you're paying for water, ethanol (which is alcohol), sugar... sugar, really?!?! and vanilla bean extract.  Hold on, I thought that's what we were making in the first place, so does this mean that it's diluted?  I don't know, so I'm hoping my homemade vanilla extract will be superior to even the fancy-shmancy Nielsen-Massey Vanilla Extract made from only two ingredients: vanilla pods and vodka.

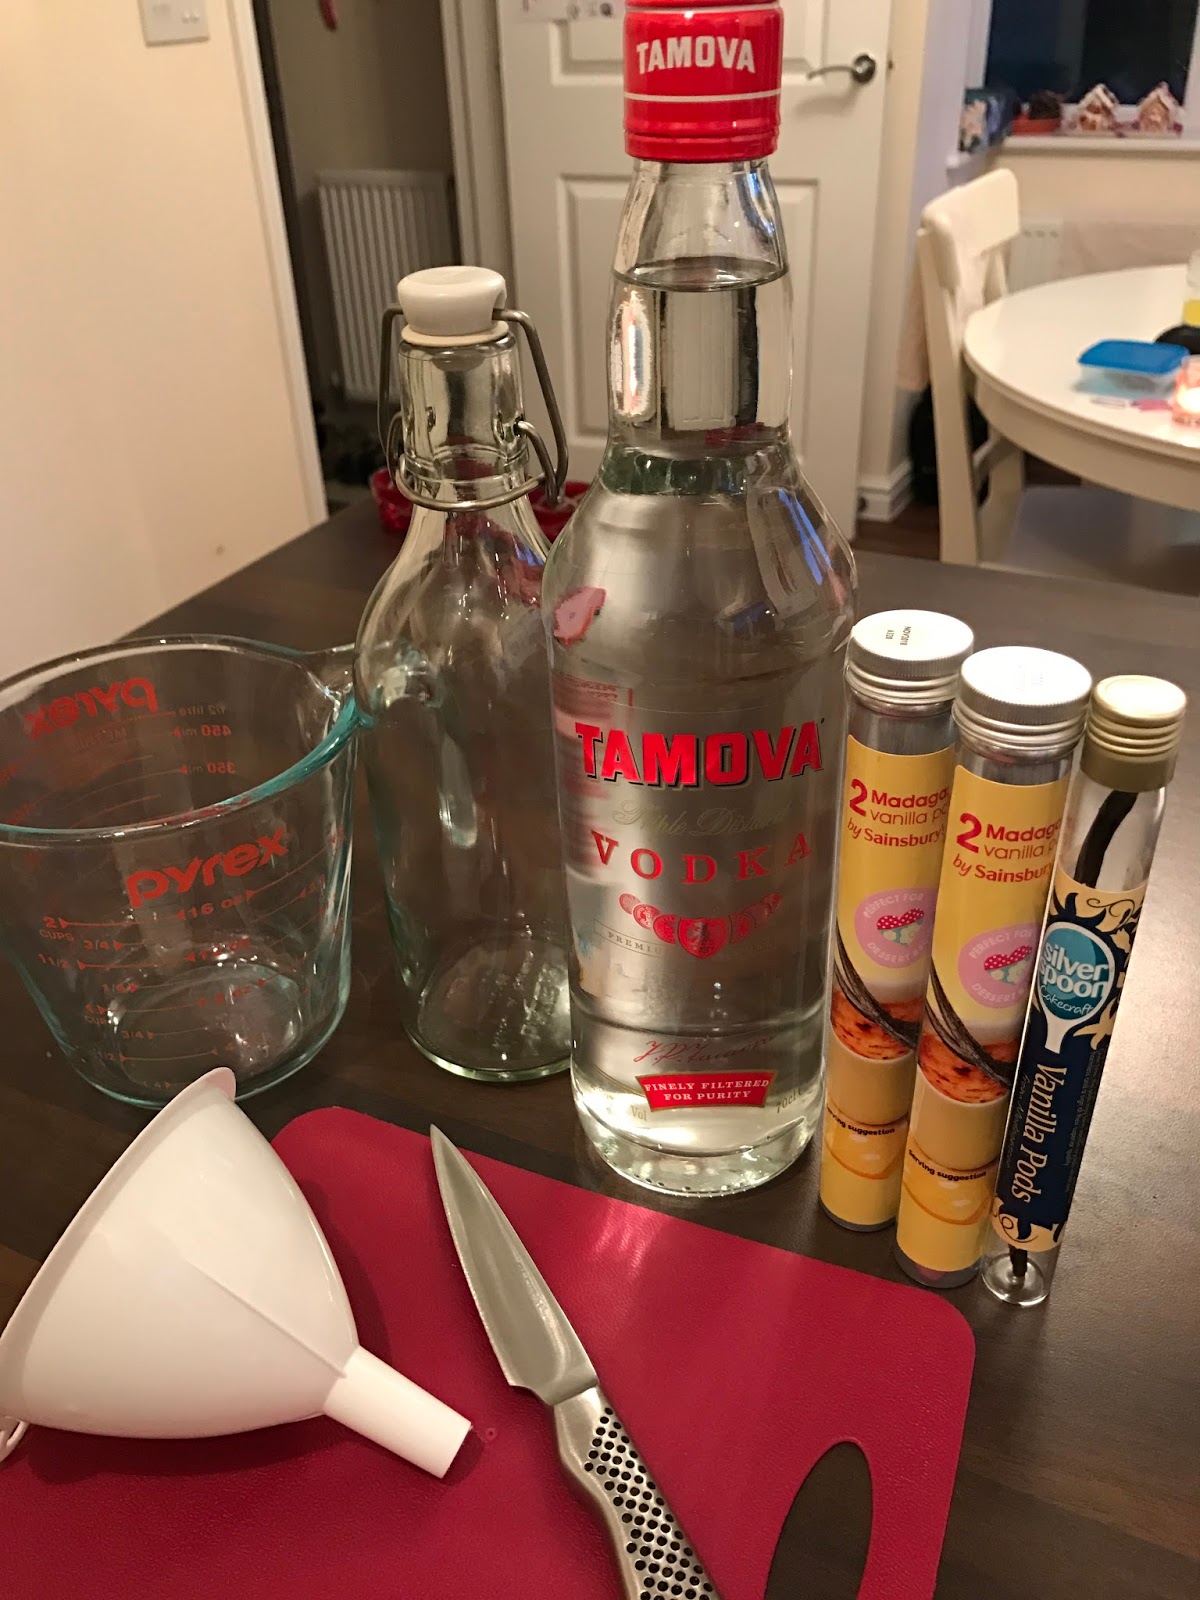
I bought a 70cl bottle of vodka from Aldi for £9.99, 4 vanilla beans from Sainsbury's for £6 (I needed 5, but already had one at home) and a bottle to store the extract in from IKEA for a £1. This adds up to £16.99; HOWEVER, I only used 12oz/ 350ml of the vodka (1/2 of the bottle), so really, the vodka I used cost £5, so £12 for the recipe.  Now, if I pay £6 for 118ml, I save about £6 by making my own. I'll try to do better next time by finding vanilla pods for a better price, perhaps online, but I don't want to compromise on the quality.  Plus, I won't have to purchase another bottle to make it in (I can even make it in the original vodka bottle next time).

This is the "recipe" I used from Cooking Light.


I sliced open 5 vanilla pods, then put them in the storage bottle. There's something very satisfying about carefully slicing open a vanilla pod. I then added 350ml of vodka, closed the lid and put it on my shelf to carefully brew/steep for the next 4 months.

I'm very excited to see the results in 4 months! I'll let you know how it turned out.